2 x BMS 18N862 Pre-Build Questions

Hi all,

I am starting to prepare for the box build. Overall shape is still up in the air as I am undecided on the layout and styling for the room. I may well revert to a more traditional cuboid shape.

I have a question on build material for the box. I know @IWC Dopplel used marine ply for his boxes and believe that MDF is typically used. Non-structural ply is a similar price to MDF (both 18mm) but nicer to work with (less toxic dust). Is there a disadvantage to using that over MDF (not worrying about exterior finish)? MDF has a higher mass/density I believe so perhaps that makes it more inert?

I did only one speaker cab in MDF and it’s horrible, dust everywhere! I think the only reason to use MDF is cost, ply is so much nicer to work with.
@AndreNewman - I was wondering if you'd had any new thoughts on your subs since you completed them and have been using them?
Not much, they work really well, cabs are a little top heavy so maybe I would have chosen a wider shorter design but then cab resonance would be even lower and well into operating range.

I re-read your thread the other day looking for dimensions / box volume but couldn't seem to locate them. Would you mind sharing them here for me please?
I can post the cutlist I was sent when I get chance, have been on holiday and now off on work travel until the end of the month.

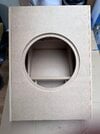
General gist is 600x600mm double 18mm baltic ply baffle and single back panel. 334x600mm side panels and 334x640mm top and bottom.
Bracing was 275x600mm x 2 with 275x180mm spacers.

Side and top bottom panels are oversized to allow router trim for when the gluing isn’t perfect…

Internal is 99L so about 85-90L when bracing and driver is taken out.

If I wasn’t depth constrained I’d make the baffles smaller and the depth deeper, the back of the driver is a bit constrained, the bracing could be simpler and a great deal easier to glue up if the box was a bit deeper.

In short don’t copy my design unless you have my constraints. Copy markymiles for a simpler to build deeper box at the same volume.
 
Oh and maybe I’d consider 40mm ply for the baffle instead of gluing up 2x18mm, that was a faff and not that solid in the end. The routing is no more difficult.
 
Thanks @AndreNewman

Regarding the baffle, does it need to be double thickness (or 40mm) if I don't plan to recess the driver and instead surface mount it?

The plans for my room are starting to come together and as such the design for my front subs is taking shape (no pun intended). I am fully embracing the spirit of DIY and making the cabinets a bespoke shape to make them work in my design. Here's how they'll look (well, this is the right handed one - the left will be a mirror / turned upside down):

1697144426441.png


I have kept the parallel sides short (50cm) when compared to the very early design. I assume a standing wave will not easily form on the longer dimensions as there is no parallel face to them.

I'll let you know how the build goes.

Cheers
 
Thanks @AndreNewman

Regarding the baffle, does it need to be double thickness (or 40mm) if I don't plan to recess the driver and instead surface mount it?
Good question.

It's all about whether the baffle is likely to resonate, so if the baffle is very slim (mostly driver) or stiffly braced then maybe it doesn't need to be so thick. However the only way, at our level of expertise, to know is to build it and find out if it's ok. :eek: Or as mattkhan is always saying to me, build both and compare them...

So most people massively over engineer just to ensure it's never ever going to be a problem.
The plans for my room are starting to come together and as such the design for my front subs is taking shape (no pun intended). I am fully embracing the spirit of DIY and making the cabinets a bespoke shape to make them work in my design. Here's how they'll look (well, this is the right handed one - the left will be a mirror / turned upside down):

View attachment 1937377

I have kept the parallel sides short (50cm) when compared to the very early design. I assume a standing wave will not easily form on the longer dimensions as there is no parallel face to them.
No parallel faces means that the resonance will be spread out over a range of frequencies, so not any one frequency will dominate, excellent. The remaining resonances will be the faces and edges, the 93cm, 50cm,75cm and whatever the max depth works out to be.

The ones I'd be concerned about would be the 93cm and the 75cm as they could well be in subwoofer working frequencies, I would think some serious bracing is required. Could you cut more of the triangular end panels, cutout for the back of the driver and use them internally as braces? If you make the triangular end panels internal, then they would all be the same size, easier to assemble.

Also I'd try to cut off the sharp angles on the baffle, to make it easier to construct.

I'll let you know how the build goes.

Cheers
 
5 months later...

My room is starting to come together and this week I decided to make a start on the DIY subs to fit within the baffle wall. The design changed a little since my posts last year and I ended up with the following box design:

1710448654777.png


This gives me a gross internal volume of 150 litres. The front baffle is a double skin with the drive recessed and fixed to the inner sheet. The 2 diagonal corners are 90 degrees and the other 2 are 65 and 115 degrees to complement the 25 degree angle of the baffle wall.

I have built the boxes out of 18mm MDF - I had 2 8x4 sheets cut into 4x2 panels by the helpful folks at B&Q (to ease transportation). I bought 3 sheets for the 2 subs but was able to make both out of just 2 sheets.

I made the cuts at home using my 250mm table saw and a 200mm handheld circular saw. I'm no woodworking master but I am happy with the overall accuracy of the cuts. It was my first time using a circular jig for my el cheapo Aldi palm router and it worked flawlessly.

The panels were glued and brad nailed with my compressed air pin nailer. I added extra glue to the joint seams in a bid to add a little strength and increase the airtight-ness. They seem very solid now that the glue has dried.

I have a few questions:
  1. Do you think I should be drilling and screwing the cabinet to add extra strength?
  2. I plan to add some bracing between the top and bottom panels (likely 'props' in the form of MDF strips say 100mm wide) and also some triangles/corner braces. How will I know when I have added enough bracing? Is this to reduce panel resonance and/or add strength?
  3. Do I need to line the cabinet with anything? I have a load of hollow fibre stuffing here doing nothing, but I don't want to add it needlessly.
Some photos attached.
 

Attachments

  • IMG_4445.jpeg
    IMG_4445.jpeg
    304 KB · Views: 25
  • IMG_4446.jpeg
    IMG_4446.jpeg
    391.4 KB · Views: 20
  • IMG_4447.jpeg
    IMG_4447.jpeg
    263.7 KB · Views: 20
  • IMG_4451.jpeg
    IMG_4451.jpeg
    382.6 KB · Views: 19
  • IMG_4452.jpeg
    IMG_4452.jpeg
    280.1 KB · Views: 17
  • IMG_4455.jpeg
    IMG_4455.jpeg
    233.9 KB · Views: 17
  • IMG_4449.jpeg
    IMG_4449.jpeg
    398.4 KB · Views: 18
  • IMG_4450.jpeg
    IMG_4450.jpeg
    379.2 KB · Views: 28
1. If it makes you feel happier but if glued properly nails should be sufficient.
2. One 100mm strip placed as far as possible centrally joining opposing panels should be sufficient.
3. I certainly did although views differ as to how effective it actually is. Also consider adding bitumen patches to panels to help with any possible resonance.
 
5 months later...

My room is starting to come together and this week I decided to make a start on the DIY subs to fit within the baffle wall. The design changed a little since my posts last year and I ended up with the following box design:

View attachment 2019690

This gives me a gross internal volume of 150 litres. The front baffle is a double skin with the drive recessed and fixed to the inner sheet. The 2 diagonal corners are 90 degrees and the other 2 are 65 and 115 degrees to complement the 25 degree angle of the baffle wall.

I have built the boxes out of 18mm MDF - I had 2 8x4 sheets cut into 4x2 panels by the helpful folks at B&Q (to ease transportation). I bought 3 sheets for the 2 subs but was able to make both out of just 2 sheets.

I made the cuts at home using my 250mm table saw and a 200mm handheld circular saw. I'm no woodworking master but I am happy with the overall accuracy of the cuts. It was my first time using a circular jig for my el cheapo Aldi palm router and it worked flawlessly.

The panels were glued and brad nailed with my compressed air pin nailer. I added extra glue to the joint seams in a bid to add a little strength and increase the airtight-ness. They seem very solid now that the glue has dried.

I have a few questions:
  1. Do you think I should be drilling and screwing the cabinet to add extra strength?
  2. I plan to add some bracing between the top and bottom panels (likely 'props' in the form of MDF strips say 100mm wide) and also some triangles/corner braces. How will I know when I have added enough bracing? Is this to reduce panel resonance and/or add strength?
  3. Do I need to line the cabinet with anything? I have a load of hollow fibre stuffing here doing nothing, but I don't want to add it needlessly.
Some photos attached.
Wood glue is actually stronger than the wood itself, so you don’t need anything more that this, providing it is clamped correctly until it sets.
 
Wood glue is actually stronger than the wood itself, so you don’t need anything more that this, providing it is clamped correctly until it sets.
^ I made the mistake of over-clamping joints when I first started out which can run the risk of squeezing all the glue out the joint. The clamp should be tight but not super tight, bar clamps have a tonne of pressure available. Nails/screws are not necessary with clamps and glue, they just make the box harder to finish and fill.
 
Thanks - that’s all really useful. I have the speakon connectors arriving today and should be able to get these put together and installed this weekend.

I need to buy more speaker cable to move the existing pair of subs to the back of the room. What gauge / cross section should I go for on subs (BMS 18) driven by a NX6000D with roughly 10m runs?
 
I know some people go for thicker cable for longer runs but I find 2.5mm cable hard enough to get in the speakon. No idea how people manage to get 4.0mm in there.
 
Proposed bracing that I’ve cobbled together from some of the off cuts. I assume this is ‘open’ enough to not cause any issues for the driver (if that’s even a consideration)?
 

Attachments

  • IMG_4465.jpeg
    IMG_4465.jpeg
    456.1 KB · Views: 26
  • IMG_4464.jpeg
    IMG_4464.jpeg
    428.4 KB · Views: 25
With the front on (dry fit) to check that the bracing doesn’t foul the driver. Seems like I’m in the clear. 🙏🏻
 

Attachments

  • IMG_4467.jpeg
    IMG_4467.jpeg
    428.6 KB · Views: 22
  • IMG_4468.jpeg
    IMG_4468.jpeg
    367.3 KB · Views: 23
  • IMG_4469.jpeg
    IMG_4469.jpeg
    407.6 KB · Views: 24
I have two 9m runs to my front subs, part of the reason I went with 8Ohm drivers.

I have 4mm kabeldirekt ofc.

You can get 4mm into both types of speakon, the bigger ones NL4FX are much easier, supposedly 6mm fits but I haven’t done it.

The trick is fresh cut and strip, don’t twist the strands, just straighten then and insert carefully.

If you bought 4Ohm then I’d say 4mm is mandatory, for 8Ohm 4 or 2.5mm should be fine.

Make sure you don’t buy cca cable, it’s not always obvious.
 
I have 4mm kabeldirekt ofc.

I have this cable for my front 3 speakers so know it well - thanks for the tip. Mine are all 8 ohm drivers.
 
Proposed bracing that I’ve cobbled together from some of the off cuts. I assume this is ‘open’ enough to not cause any issues for the driver (if that’s even a consideration)?

Those central unsupported sections could do with some bitumen panels I think on all four sides.
 
Proposed bracing that I’ve cobbled together from some of the off cuts. I assume this is ‘open’ enough to not cause any issues for the driver (if that’s even a consideration)?
Only thing I would do differently is, drill some holes in the triangular panels either side of the driver magnet, just for less turbulent airflow, maybe it matters, maybe it doesn't but it's easy to do.

Like I did here:
 
I have this cable for my front 3 speakers so know it well - thanks for the tip. Mine are all 8 ohm drivers.
It's lovely cable, also for some reason they don't put the meter marks on the 2.5mm version, very annoying, I've been using the 2.5mm for tweeters so it's easy to see which is which, probably the tweeters could be 0.1mm :cool:
 
Proposed bracing that I’ve cobbled together from some of the off cuts. I assume this is ‘open’ enough to not cause any issues for the driver (if that’s even a consideration)?
On the one hand, it looks a little underbraced (big gaps). On the other hand, I have never heard an audible difference in subs from bracing (except for the sound it makes when you tap it).
 
Actually, looking again at the bracing, I'd making the internal bracing a copy of the sides or just bring it up to the baffle, line it up with the driver fixings. That way the baffle is strategically braced and the driver fixings have more to bite into. I'd then do loads of big holes in the braces or drill and router out some openings for airflow.
 
Agree, looks a little light on bracing. Bitumen lining will do nothing at subwoofer frequencies, it’s mostly useful for mid/high cabs. You want stiffness and mass aka more bracing.
 
The most need of bracing will be the panel centre and ideally you triangulate as much as possible. Nothing lost in over engineering in my view. MDF is has less stiffness than ply so adding strategic bracing worthwhile to me
 
Id move your triangles in a bit and try and reduce the flex on the front / back panel

IMG_4465.jpeg
 
Thanks again for the input everyone - it is greatly appreciated.

I am aiming to take a pragmatic approach with each element of the room I am building, applying resources where I aim to get maximum 'bang for buck'. Of course, a few pieces of MDF and a little time to cut and fit additional bracing is quite a low cost.

Regardless of how much additional bracing I add, I am wondering if there's an acoustical test that can be performed to assess whether the cabinet is sufficiently braced? I imagine that an inert cabinet is desirable as it will not add unwanted noise/distortion to the sound produced by the driver. If so, can we test for said unwanted sound in some way using REW perhaps?
 
Love that drawing @IWC Dopplel - thank you! I will give this a shot along with the other suggestions from @AndreNewman and @Ringnut whilst noting the comments from @Liammonty123 and @mattkhan (I have the DIY speaker royalty posting here - I'm genuinely honoured guys).
 
I imagine that an inert cabinet is desirable as it will not add unwanted noise/distortion to the sound produced by the driver. If so, can we test for said unwanted sound in some way using REW perhaps?
IME the most obvious and audible way to tell the difference is to run an orbital sander on the panel. You can really make them sing! I have never ever measured a difference on a sub in actual use though it certainly feels nice to have built a solid box:)
 

The latest video from AVForums

What makes a 10/10 4K Blu-ray disc?
Subscribe to our YouTube channel
Back
Top Bottom